← all tags

#Tools & Utilities

Software I made to make my life easier

7 entries — 2 posts, 5 notes

calsync: It syncs calendars

Before the COVID shut down, I really didn’t worry about accessing my work calendar while at home. I was just at work, from 9 to 5, Monday through Friday. I even left my laptop at work back then…

But now that I work remotely and have kids, organizing my time has become much trickier. Family and personal events started impacting my work day a lot more. My life is spread accross a few different calendars:

  • Personal
  • Household
  • Lisa’s (for awareness)
  • Work Meetings (work account)
  • On Call (work account)

The hard part is that they cross work/life boundaries. A kid’s dentist appointment on Household calendar doesn’t automatically block my time in my work calendar. And my wife can’t see when my meetings are when making plans that include me.

The whole thing comes down to the wall between my work life and my personal life. Work lives in one Google account, my personal and shared calendars live in another, and getting them to cooperate across that wall - without handing either side access it shouldn’t have - is the entire problem.

A few years ago, I wrote a little Google Apps Script to copy my personal appointments onto my work calendar as “busy” blocks. It worked, but it only solved half of the problem I actually have. So I wrote a second, more complex script to go the other way with slightly different features.

I made: calsync.

I want to see my work calendar without giving work my personal devices. I want my meetings on my phone, and I want Lisa to see when I’m busy so she can plan around it. There are only 2 real options, and both stink: opening up the Slack calendar app; or log into my work account on my personal phone, allowing work to enforce device policies I don’t want. I just want to know what time my next meeting is.

I want my personal life to block off my work day. Dentist appoints, haircuts, (maybe interview…) - these happen between 9 and 5, and if they only exist on my personal calendar, a coworker will book a meeting right over them if I double double-enter my events. And the calendar slot undersells the real cost. “Dentist, 2:00-2:30” ignores the drive there and back, the context switch, and the few minutes it takes catch up on whatever happened in Slack while I was gone.

Mask: show that you’re busy, without the details

The first move is the one the old script did. Take an event from a personal calendar and drop a copy onto my work calendar as an opaque block. Same time slot, but the title and notes are gone - coworkers see “Busy,” not “Dentist - Dr. Toothy.”
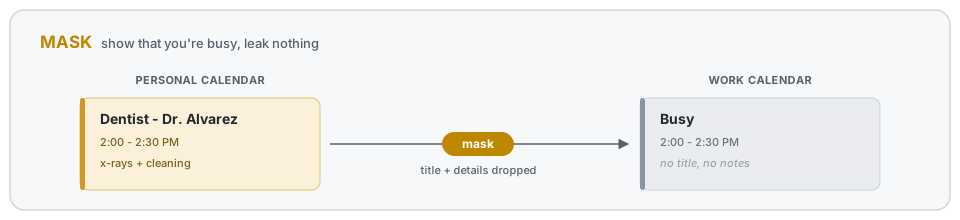
Mask: a personal event becomes an opaque "Busy" block on the work calendar

Buffer: pad the block

A 2-2:30 appointment isn’t really over at 2:30. I have to drive back home and get my head back into work. So the busy block gets padded on both ends by a buffer. The half-hour haircut becomes a wider hold on my work calendar.
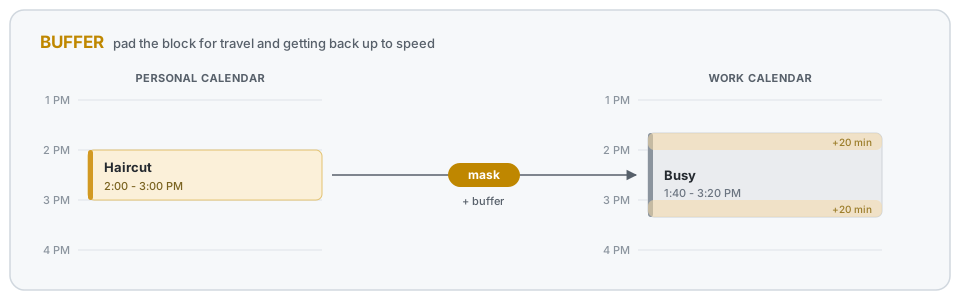
Buffer: the busy block is padded past the appointment on both ends

Mirror: see my work day on my own calendar

The other direction, and the half the old script never did. Take my work meetings and copy them onto a personal calendar - but just the title. No guest list, no attached docs, no meeting notes. Enough to see the shape of my day on my phone, with none of the work content riding along where it shouldn’t.
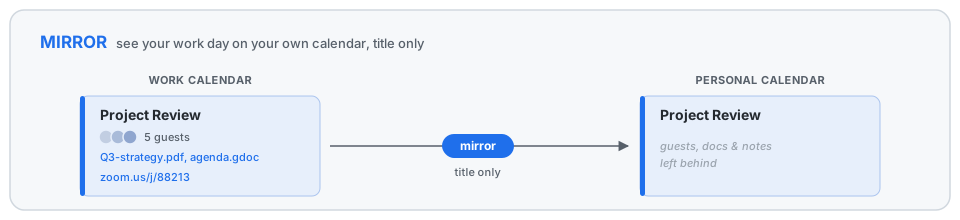
Mirror: a work meeting copied to the personal calendar as title only

This is the half that lets Lisa glance at her calendar and see I’m in a meeting from 10 to 11, without either of us logging into my work account.

Extras: carry the two things I actually reach for

The title is usually enough, but two details are worth carrying over, and each is its own switch.

The join link, for when I’m running late and need to drop into a Zoom from my phone while walking to the car - no laptop, no digging through email.

The room, for when I’m on-site and have no idea where a meeting actually is. I want to glance at my phone and see “Skyscraper, 4th floor, Room 2” not pull out my laptop to find it.
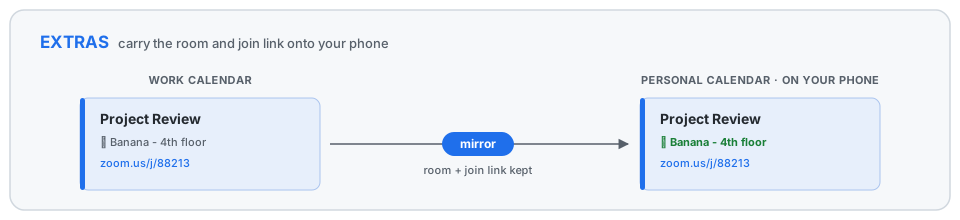
Extras: the room and join link carried onto the personal calendar

Quick setup

It’s a Google Apps Script, so there’s no server to babysit - it lives in your Google account and fires whenever a calendar changes. Setup is mostly wiring:

  1. Share the calendars you want to sync into the account the script runs as - read on the sources, write on the targets.
  2. Clone the repo, npm install, and copy the template: cp Config.example.js src/Config.js.
  3. Edit src/Config.js (below) with your calendars and rules.
  4. npx clasp login, npx clasp create --type standalone --rootDir src, then npx clasp push to send it up.
  5. In the Apps Script editor, run dryRunAll to preview, syncAll to do it for real, and setupTriggers once to keep it running on its own.

The config is the whole interface. You name your calendars once, then write rules against those names. Here’s roughly what mine looks like:

// Name the calendars once; rules reference these names.
const CALENDARS = {
  work: 'primary',                       // the account calsync runs as
  personal: '[email protected]',          // shared into the work account
  family: '[email protected]',
  phone: '[email protected]', // a calendar I read on my phone
};

function getSyncRules() {
  return [
    // Personal life -> work, as opaque "busy" blocks padded for travel.
    {
      name: 'personal_to_work',
      mode: 'mask',
      sources: ['personal', 'family'],
      target: 'work',
      maskTitle: 'Busy',
      bufferMinutes: 20,                  // a 2:00-2:30 appt holds 1:40-2:50
      color: CalendarApp.EventColor.YELLOW,
      visibility: CalendarApp.Visibility.PRIVATE,
      includeWeekends: false,
      excludeTitles: ['[free]'],          // skip personal events tagged [free]
    },

    // Work day -> a calendar I read on my phone: titles, room, and join link.
    {
      name: 'work_to_phone',
      mode: 'mirror',
      sources: ['work'],
      target: 'phone',
      copyLocation: true,                 // carry the room
      extractUrlRegex: 'company\\.zoom\\.us', // carry a matching join link
      excludeTitles: ['Busy'],            // don't mirror my own mask blocks back
    },
  ];
}

The mask rule is the one I lean on most. bufferMinutes is the travel-and-context-switch pad, maskTitle and visibility are what keep the details off my work calendar, and excludeTitles lets me opt a personal event out by tagging it [free]. Everything not set falls back to sensible defaults, so a rule only has to say what’s interesting about it.

If you want to run your own, setup and the full list of knobs are in the README.
This video starts with me “showing off” my home-spun map editor. It did what I needed earlier on - had swap-able swatches, layer rendering controls, copy/paste abilities, entity property management, and more. Then, it shows me opening the same map in TIled, changing the position of some entities, and finally walking around in the edited map.

When I first started this project, my instinct was to use Tiled to map editing. But I really didn’t enjoy the libraries available, so I developed my own internal data format for maps, and also wrote my own map editor. That was fun, but ultimately stupid.

I still like the map data format I landed on, it integrates nicely with my rendering engine. But I finally bit the bullet and wrote a converter that can parse a Tiled map and convert it to my internal format. Now I can stop worrying about implementing quality-of-life improvements for my bespoke map editor, and instead focus on building the game itself…

PS: I also bought @snowhex’s tileset to use as a placeholder for my sprites - letting me focus on implementing the game engine instead of attempting to draw decent looking pixelart.

Pokemon: Rocket Edition - Learnsets

Pokemon: Fire Red - Rocket Edition is a popular ROM-hack. As part of the hack, the pokemon evolutions and level-up move sets were heavily tweaked. For the life of me, I couldn’t find a resource online that listed these changes, so I decided to post my own findings.

Skip the how, and just bring me to the data!

Method

I used the HexManiacAdvance tool to inspect my patched ROM. Using the following script in the Tools > Show Automation Tool window, I was able to generate a JSON dump of the data I was looking for:

import json

ps = {}

for i, n in enumerate(data.pokemon.names):
  ps[i] = {'name':n.name}

for i, id in enumerate(data.pokedex.national):
  ps[i]['id'] = id.index

for i, e in enumerate(data.pokemon.evolutions):
  ps[i]['evolutions'] = []
  if e.method1 != 'None':
    ps[i]['evolutions'].append({'method':e.method1, 'arg':e.arg1, 'species':e.species1})
  if e.method2 != 'None':
    ps[i]['evolutions'].append({'method':e.method2, 'arg':e.arg2, 'species':e.species2})
  if e.method3 != 'None':
    ps[i]['evolutions'].append({'method':e.method3, 'arg':e.arg3, 'species':e.species3})
  if e.method4 != 'None':
    ps[i]['evolutions'].append({'method':e.method4, 'arg':e.arg4, 'species':e.species4})
  if e.method5 != 'None':
    ps[i]['evolutions'].append({'method':e.method5, 'arg':e.arg5, 'species':e.species5})


for i, lu in enumerate(data.pokemon.moves.levelup):
  ps[i]['moves_levelup'] = []
  for m in lu.movesFromLevel:
    mid = m.pair.move
    ps[i]['moves_levelup'].append({
      'move':{
        'name': data.pokemon.moves.names[mid].name,
        'power': data.pokemon.moves.stats.battle[mid].power,
        'type': data.pokemon.moves.stats.battle[mid].type,
        'accuracy': data.pokemon.moves.stats.battle[mid].accuracy,
        'pp': data.pokemon.moves.stats.battle[mid].pp
      },
      'level':m.pair.level
    })


for i, tmc in enumerate(data.pokemon.moves.tmcompatibility):
  ps[i]['moves_tm'] = []
  for num, m in enumerate(data.pokemon.moves.tms):
    name = m.move
    if " " in name:
      name = '"' + name + '"'
    if tmc.moves.HasField(name) and tmc.moves[name] > 0:
      mid = m.move
      ps[i]['moves_tm'].append({
        'name': data.pokemon.moves.names[mid].name,
        'tm': num + 1,
        'power': data.pokemon.moves.stats.battle[mid].power,
        'type': data.pokemon.moves.stats.battle[mid].type,
        'accuracy': data.pokemon.moves.stats.battle[mid].accuracy,
        'pp': data.pokemon.moves.stats.battle[mid].pp
      })

f = open("pokemon.json", "w")
f.write(json.dumps(ps, indent = 2))
f.close()
print("done")

The output looked something like this:

{
  "64": {
    "name": "Kadabra",
    "id": 65,
    "evolutions": [
      {
        "arg": 33,
        "species": "Alakazam",
        "method": "Level"
      }
    ],
    "moves_tm": [
      {
        "pp": 20,
        "type": "Fight",
        "tm": 1,
        "name": "Focus Punch",
        "accuracy": 100,
        "power": 150
      },
      {
        "pp": 20,
        "type": "Psychc",
        "tm": 4,
        "name": "Calm Mind",
        "accuracy": 0,
        "power": 0
      },
      // ...
    ],
    "moves_levelup": [
      {
        "move": {
          "pp": 20,
          "type": "Psychc",
          "name": "Teleport",
          "accuracy": 0,
          "power": 0
        },
        "level": 1
      },
      {
        "move": {
          "pp": 15,
          "type": "Psychc",
          "name": "Kinesis",
          "accuracy": 80,
          "power": 0
        },
        "level": 1
      },
      // ...
    ]
  }
  // ...
}

Then I just wrote a little golang script to print out the Markdown.

I hope it helps!

Explorer

Search by name, click to add a Pokemon to the comparison list, click again to remove. You can stack as many as you want side-by-side, and the URL hash tracks your selection so the “Open standalone” link preserves what you’re looking at.

Open the explorer in its own tab ↗

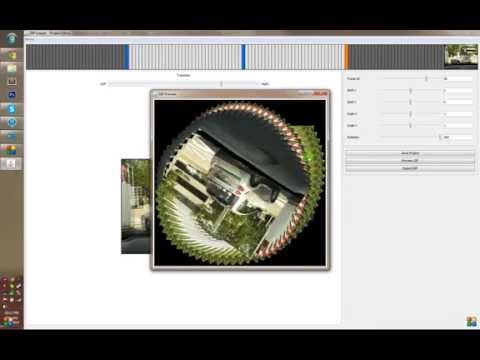
I made this tool to aid in creating perfectly looped and stabilized GIFs. From time to time I’ll take a video with my phone hoping that someday I’d turn it into a GIF and make it a perfect loop. I made this little app to avoid the manual task of shifting frame by frame so things lined up, and solved it by letting the user define “animation anchors” - the app interpolates from anchor to anchor to create smoother loops.

I originally made it for personal use so it’s not polished and there are some quirks. Let me know if you like the idea and maybe I’ll clean it up some more or add more features.

Source on GitHub

Originally posted to /r/perfectloops. I had a handful of sample before/after GIFs (Gears #1 and #2) hosted on Gfycat, which has since shut down - so those links are dead.

Demo

GIFLooper Demo

Listr was a simple app for keeping itemized lists and sharing them with other people.

The idea came from a mundane problem: Lisa and I wanted one grocery list that both of our phones could edit. Everything we tried was either too heavy or too fiddly for something that should just be a list. So I built my own. (We eventually gave up and moved to WunderList, which we loved - but by then I had already learned the thing I actually wanted to learn.)

You could register, spin up a list, and start adding items right away: check them off, archive the ones you didn’t want cluttering the view, or delete them outright. It auto-completed new items from what you’d added before, which made repeat grocery runs quick. You could add friends and share a list with them to edit together.

The reason Listr mattered to me wasn’t the feature set - it was the architecture. It was my first real attempt at a JavaScript front-end application talking to a web-service API rather than a page rendered whole by the server. The backend was a RESTful API in PHP over MySQL; the front end was served as a shell by PHP and then ran on jQuery in the browser, calling the API for everything. That split - a dumb server handing data to a smart client - is the shape of basically everything I’ve built since.

Source on GitHub