Posts page 2 of 2

Science vs. Technology

College School Work

I asked over a hundred people: What’s more important to society: Science or Technology?

Science vs. Technology Banner Image

In my “Science, Technology and Society” course at VTC we were asked: What is Science? What is Technology? And, how are they related? It was apparent that everyone in the class had different opinions on their meanings and relation. I found the discussion afterwards and the related reading interesting enough that I wanted to find out what other people thought. So, I decided to send a survey around asking people to do as my class did; here are my findings.

All of this was way back in January (of 2015), and I’ve only recently had the time (just graduated) to put some of the data together.

Just wanna see the data? Jump to the Results.

I compiled all of my data into an MS Excel spreadsheet for those of you who would like to look at it themselves. I will be referencing the difference sheets in this document throughout this post. You can download it: here.

The Survey

The survey I put together aimed to gather some basic information about the surveyee’s definition and relation of Science and Technology. It consisted of the following questions:

Describe “Science/Technology” in a few words. (2 Questions)

The goal of these questions was to find what keywords people used when describing Science or Technology. By gathering the words used to describe the terms, we should be able to find a pretty accurate definition via related words and synonyms.

Obviously, there is a distinction between Science and Technology but they do share many similar aspects. They also heavily influence each other blurring the line between them even further. The surveyee was asked to give a rating from 1-10 where 1 is “They’re totally different” and 10 is “They’re the same thing.”

How much does “Science/Technology” directly influence your life? (2 Questions)

Considering how closely related they both are, I wanted to find out which of the two people were more influenced by. People were asked to rate the influence of both (separately) on a scale of 1-10, where 1 is “It doesn’t affect me at all” and 10 is “Science/Technology is a large part of my life.”

What’s more important to the advancement of the human kind?

This question took the previous one, and abstracted it to the whole of humankind, instead of the individual.

(Optional) What is your gender?

This one was just to find the differences in responses based on gender. It was optional and not really necessary but sometimes it’s fun to see the social differences between genders.

Like a Virus

I created this survey with Google Forms and shared it on my Facebook asking my friends to fill it out and share it. I was only expecting a handful of responses but within a day my post was “shared” by multiple people, and I had people asking for my findings when I was done. I spent the following days waiting for the results to slow down to a point where I thought I had gotten a good enough sample size. By this time I knew I was going to have to do a full write up due to the final scale of this little project.

I released the survey at 9am on Wednesday (1/28/15), and closed submissions at 1pm on Saturday (1/31/15). Over that time I was able to gather 117 responses including 1 double submission and 1 “troll” submission. This left me with 115 unique, valid form responses. Awesome. Time to start doing something with all this data.
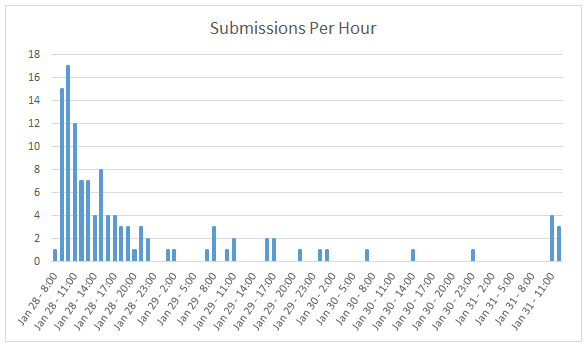
submissions per hour

The rate of form submissions per hour while the survey was open.

Processing the Submissions

Google Forms dumps all the data collected into a giant Google Spreadsheet. It’s a great medium for the submissions but it’s difficult to get more intricate statistics from that. To do anything fun with the data I had to restructure it into a more accessible format.

The Database

I decided to store everything in a small database. The 1-10 scale ratings were no big deal to store, but for the Science/Technology keywords I had to mold the data a little. The main task was to map words to their “root meaning.” For example, the following: explore, explores, exploring, explorers and explored; should be represented as one word, explore. I also had to ignore common, non-descriptive words like the, an or and. (You can see the mappings I chose in the “Keyword Mappings” sheet of the Excel Spreadsheet linked below.)

The final table structure for this database was small, but served its purpose. It contained a main table, “submissions,” that held all the multiple choice answers, a “word” table that stored all the used words and what they mapped to, and a “words” table that associated what words each submission used to describe either category (Science or Technology.)
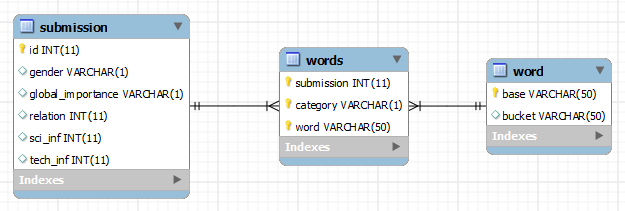
The database schema design.

The Results

All of these results can be found within the various sheets in this MS Excel Spreadsheet. (That also includes the SQL dump of the tables and the SQL queries used to find the results.)

Overall, about a third of the submissions were male, two thirds were female and a handful of submissions that didn’t specify. Keep in mind that due to this, female submissions will look about 50% larger than males in the following charts, making it difficult to visually compare male to female data.
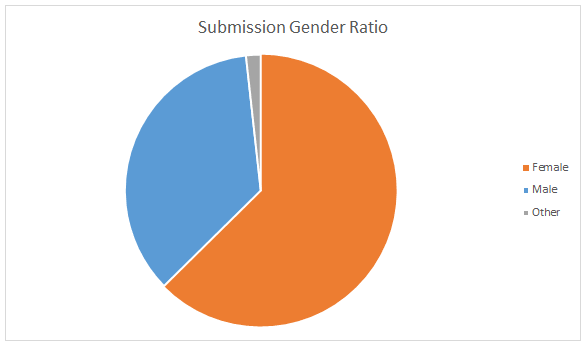
proportions of male, female and other submissions

The proportions of male, female and other submissions.

Influence

On average, when asked to rate the personal influence of Science and Technology, people said that science was rated at 7.9 and Technology at 8.5. Though the average was close, the standard deviation is far different between the two. The Science ratings were more evenly distributed in the 6-10 range, where Technology had an overwhelming peak right at 10.
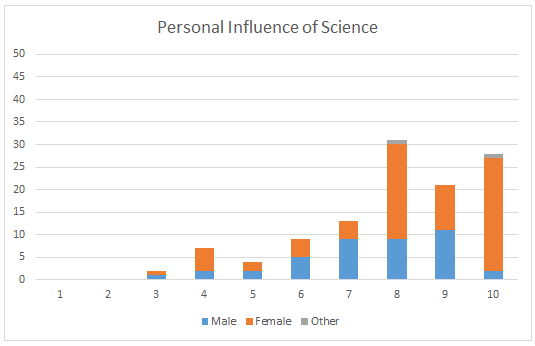
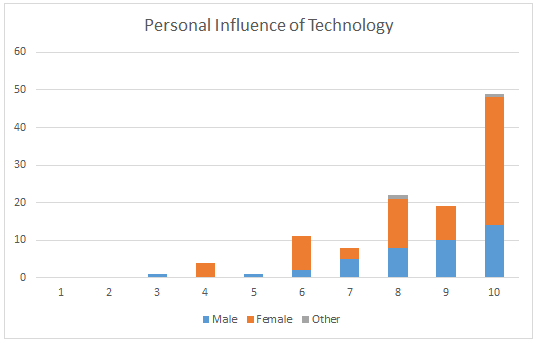
personal influence of science

personal influence of technology

When rating Technology, the gender distribution was about even, but for Science there is a clear difference. Almost no males rated Science at a 10, where nearly half the female submissions rated it a 10.

In general though, people considered Technology to be more influential in their lives. When asked which was more important to (the advancement of) the humankind though, Science came out well on top (if we consider “Equal” to be neutral.)
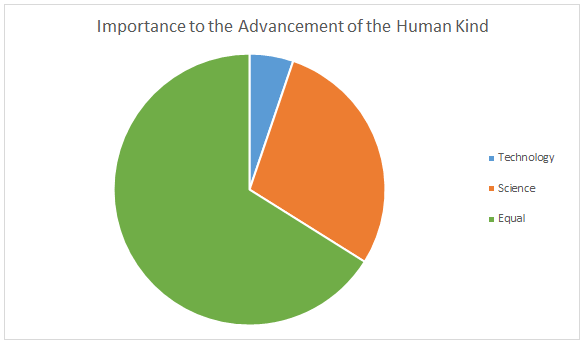
influence on human kind

Keywords

When processing the term definitions/keywords I originally just counted the number of times a word was used amongst all the submissions and ranked the words in order of uses. However, I noticed that someone who offered a longer definition had a stronger influence on the results than someone who gave a more precise response. While a longer response may offer a “better,” more detailed definition, this survey was looking for average definition. To accomplish equal representation for each surveyee I weighed the word usage based on the number of words used in a surveyee’s definition. (If someone used 4 words in their definition, each of their word uses would be counted as 0.25 uses.)

On average, surveyees used 3.5 words to describe each term. But there is also an interesting group of people who used 8 words to define the terms. Here’s distribution of words per submission.
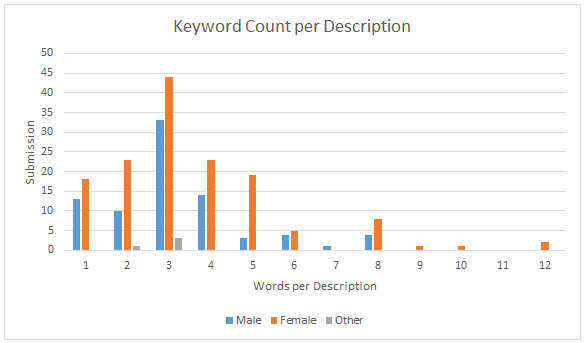
keyword counts per submission

Science

According to the Merriam-Webster dictionary, Science is the “knowledge about or study of the natural world based on facts learned through experiments and observation.” The top 5 words used to describe Science were: knowledge, fact, proof, test and explore. At least this little experiment shows that the social definition is pretty close to the technical definition.
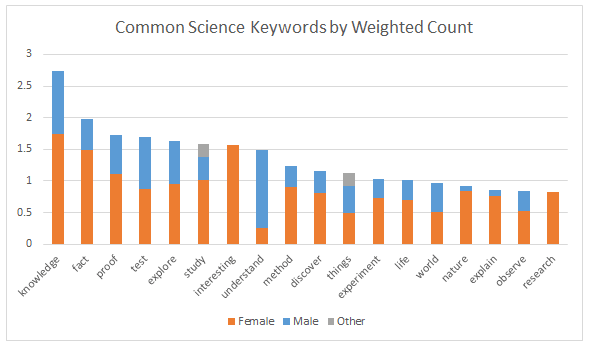
science keywords weighted, sorted by total

Weighted keywords describing Science ordered by overall usage. View the non-weighted version here.

Some interesting things emerge when you rank the words based on gendered usage however. Notice how one gender frequently uses words to describe Science that the other never does. For example, the top Science keyword for males was “understand,” very few females used this word. On the flip side, the 2nd most used keyword for Science was “interesting.” Not one male used that word in their description. The trend is visible for a lot of the words listed below.
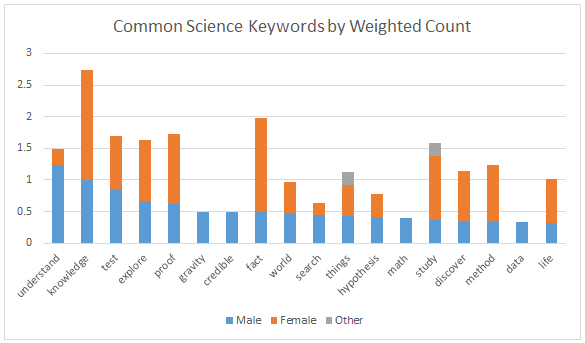
science keywords weighted, sorted by male

Weighted keywords describing Science ordered by male usage. View the non-weighted version here.
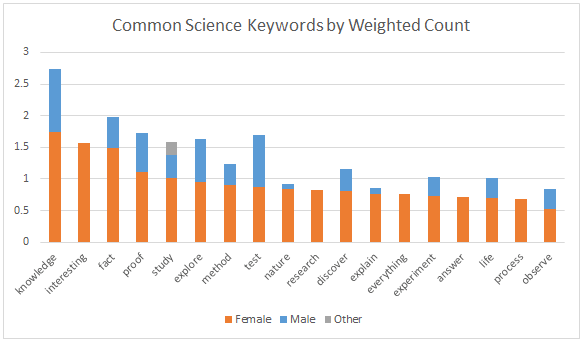
science keywords weighted, sorted by female

Weighted keywords describing Science ordered by female usage. View the non-weighted version here.

Technology

Dictionary.com defines Technology as the knowledge involved with creation and use of technical means, or the application of such knowledge. I think this survey shows again that the social definition is pretty spot on with some of the top ranking words being: tool, application, science and make.
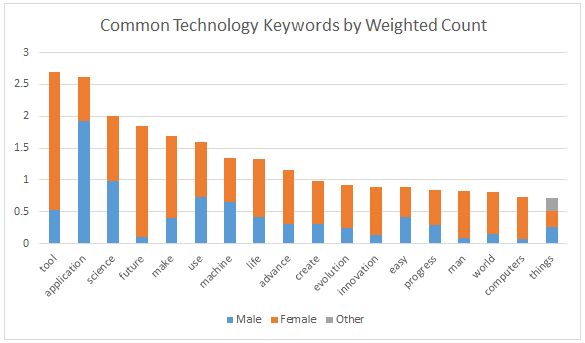
technology keywords weighted, sorted by total

Weighted keywords describing Technology ordered by overall usage. View the non-weighted version here.

Similar to Science, the gender distribution between Technology keywords is pretty interesting. Take a look at the top two keywords: application and tool. Both are dominated by one gender. There are few male dominated words for Technology, but a lot of the top 10 for female keywords were rarely used by males: future, make, life, advance, innovation, etc.
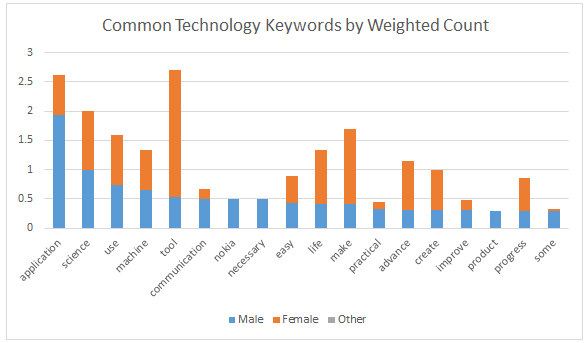
technology keywords weighted, sorted by male

Weighted keywords describing Technology ordered by male usage. View the non-weighted version here.
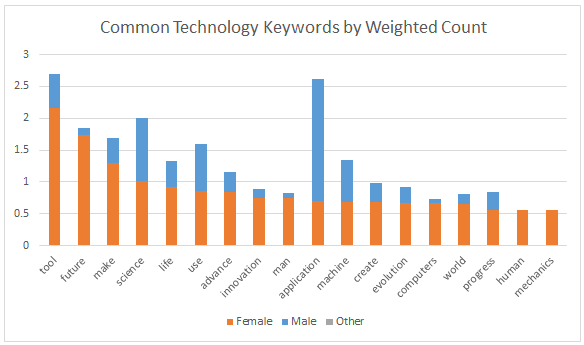
technology keywords weighted, sorted by female

Weighted keywords describing Technology ordered by female usage. View the non-weighted version here.

Comparing Them

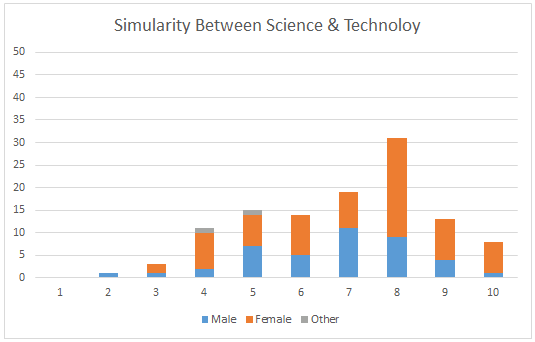
One of the questions on my survey also asked people to rate the similarity between Science and Technology. With 1 meaning they’re totally different and 10 meaning they’re the same thing the average surveyee rated the similarity at 6.9 (male average: 6.7. female: 7.1). The rating isn’t on a finite scale and the result is up to interpretation, but in general it seems that people think that the two are fairly similar to each other.
science equals tech?

Submission ratings of the similarity between Science and Technology.

If we take the intersection between the top 15 keywords for both Science and Technology we find that the following words were used to describe both: things, life, and world. You can come to a lot of conclusions, but I’d like to think that the relationship is that Science is the knowledge of, and Technology is application or tools of the things in this world that affect our lives. But that might just be wishful thinking. If we expand the keyword count to 25 from 15, we also find that advance enters the intersection implying that both do in fact advance the human kind.

Reflections

I started this survey out of pure curiosity and ended up finding some pretty neat findings. I think if anything the cumulative results of this little social test reaffirmed my understanding of what both Science and Technology are, and how they relate. That being said, most information I found is purely subjective. None of this was professionally documented or obtained and my “findings” should be taken with a grain of salt.

Cover Photo by Freepik

Tools & Utilities
Open Comment

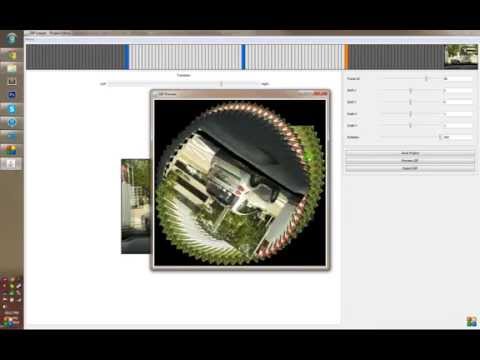
I made this tool to aid in creating perfectly looped and stabilized GIFs. From time to time I’ll take a video with my phone hoping that someday I’d turn it into a GIF and make it a perfect loop. I made this little app to avoid the manual task of shifting frame by frame so things lined up, and solved it by letting the user define “animation anchors” - the app interpolates from anchor to anchor to create smoother loops.

I originally made it for personal use so it’s not polished and there are some quirks. Let me know if you like the idea and maybe I’ll clean it up some more or add more features.

Source on GitHub

Originally posted to /r/perfectloops. I had a handful of sample before/after GIFs (Gears #1 and #2) hosted on Gfycat, which has since shut down - so those links are dead.

Demo

GIFLooper Demo

Procedural Cave Generation

What’s better than procedural generation with an organic twist?

Procedural Cave Generation Banner Image

In one of my previous posts I used a method to generate random dungeons based on graphs. In my implementation the rooms were rectangles, connected by hallways that would turn at 90 degrees - perfect for a dungeon. But caves have a different set of requirements:

  • Cave passages need to be fluid and have curves.
  • Cave walls need to be rugged, not confined to the 90 degree X and Y grid.
  • Cave passages need to have dynamic widths: some larger, some smaller.
  • Caves need larger areas, “caverns”.

With these requirements in mind, I thought that if I randomly generate points on a grid and connected them with a Relative Neighborhood Graph I could somehow morph the edges to create the curves and more “natural” walls.

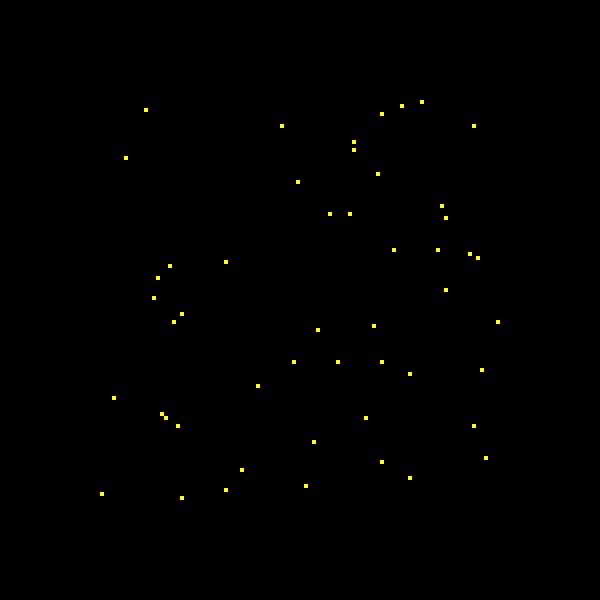
To start, I generated the random points. The process is pretty straightforward - I have a predefined area within which I want the cave (defined by a width, height, and some padding).

int x, y;
for (int pointId = 0; pointId < _pointCount; pointId++) {
    x = _random.nextInt(_width - _padding * 2) + _padding;
    y = _random.nextInt(_height - _padding * 2) + _padding;
    _points[pointId] = new Point(x, y);
}

random points

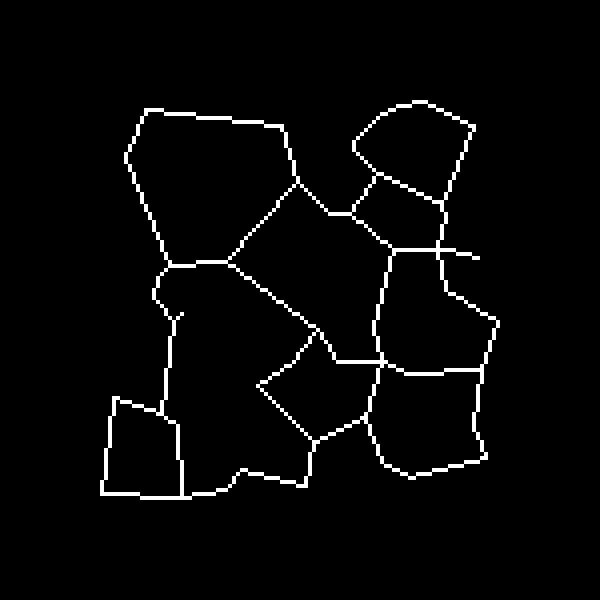
Then I connected them with lines as an RNG graph. In short, it’s an undirected graph where you connect any two points (a, b) where there isn’t a third point (c) that is closer to both (a) and (b) than (a) and (b) are to each other.

Point a, b, c; // the three points
float abDist, acDist, bcDist; // the distances we care about (stored as a squared distance)
boolean isEdge;
for (int aid = 0; aid < _pointCount; aid++) {
    for (int bid = aid + 1; bid < _pointCount; bid++) { // for every pair of points (a and b)
        isEdge = true; // assume it's an edge
        a = _points[aid];
        b = _points[bid];
        abDist = a.squaredDistance(b);
        for (int cid = 0; cid < _pointCount; cid++) { // for all points other than a and b
            if (cid == aid || cid == bid) continue;
            c = _points[cid];
            acDist = a.squaredDistance(c);
            bcDist = b.squaredDistance(c);
            if (acDist < abDist && bcDist < abDist) { // if c is closer to b and a, then a is to b
                isEdge = false; // it's not an edge
                break; // and we can stop looking for this set of a and b
            }
        }
        if (isEdge) a.edges.add(b); // if no other point (c) is closer, make an edge!
    }
}

points connected via RNG

So, now I have a basis for a cave system. I’ve got loops and passage ways and it’s not confined to 90 degree turns. There’s one catch though: it’s not very natural (yet). The passage ways are a uniform width and there is no “curviness” to the walls. So I started looking around. I was focused on biologic and organic growth. I thought I could let the cave “grow.” I found Cellular Automaton; the basis of Conway’s Game of Life. From there I found a lot of great resources on the Procedural Content Generation Wiki, specifically this one by Jlund3. But it has its issues: you couldn’t control the shapes of the cave and there were chances of pockets of air that weren’t connected to each other.

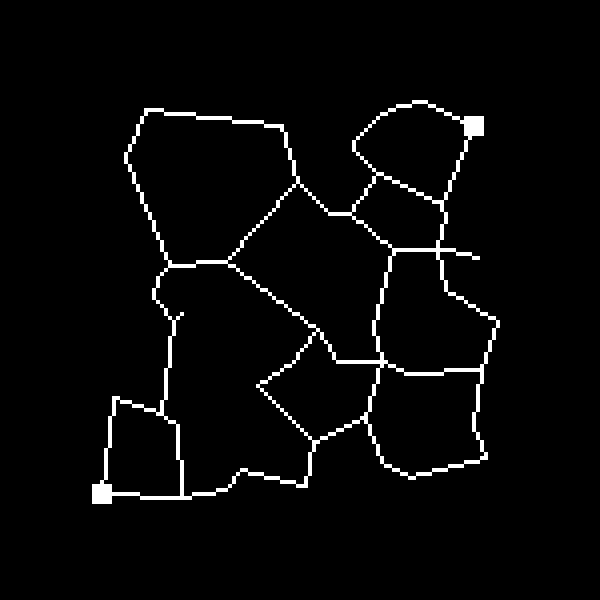
I ended up coming to the conclusion that I could treat my above image like a petri dish and pretend the lines I drew of my graph were like lines of some kind of organic goop. Then after I gave it some time, the organic goop could grow and form more natural structures and pathways. From here on out the entire process is basically greyscale pixel manipulation. For the entrance and exit I drew some larger shapes to ensure they would grow to an adequate size for stairs or ladders. This was now my starting “petri dish.”

cave passages chosen

Now I needed to come up with an algorithm that would “let the pixels grow.” The basis of following algorithm is that if a pixel is “large” enough (i.e. it’s value is above a certain threshold), it will grow into other neighboring pixels.

// amount: the growth amount if a growth is to occur
// seedLimit: for every pixel, only let it grow if it meets this threshold
// chance: if a pixel meets the threshold, it should only grow into its neighbors
//         this percentage of the time
// growRadius: size of the growth area - as a square around the seed pixel.
public void grow(float amount, float seedLimit, float chance, int growthRadius) {
    // hold the pixel growth separate from the map while we calculate the growth
    float[][] growth = new float[_height][_width];
    int tx, ty;
    for (int y = 0; y < _height; y++) {
        for (int x = 0; x < _width; x++) { // for each pixel
            if (_map[y][x] >= seedLimit) { // if this pixel meets the threshold - it's a seed!
                // loop through all neighbors within the radius
                for (int dy = -growthRadius; dy <= growthRadius; dy++) {
                    for (int dx = -growthRadius; dx <= growthRadius; dx++) {
                        tx = x + dx;
                        ty = y + dy;
                        // don't grow outside the map boundaries
                        if (tx < 0 || ty < 0 || tx >= _width || ty >= _height) continue;
                        // double the seed pixel's amount when it grows
                        else if (tx == x && ty == y) growth[y][x] = _map[y][x];
                        // roll the dice, if it meets the chance, grow that neighbor
                        else if (_random.nextFloat() <= chance) growth[ty][tx] += amount; //\_map[y][x];*
                    }
                }
            }
        }
    }
    // apply the accumulated growths to the map itself
    for (int y = 0; y < _height; y++)
        for (int x = 0; x < _width; x++)
            _map[y][x] = clamp(_map[y][x] + growth[y][x]);
}

We’ll want to run this growth algorithm a couple times (come on, bacteria doesn’t grow in 10 seconds flat). To make that a little easier we can create a little helper method:

public void growMultiple(int count, float amount, float seedLimit, float chance, int growthRadius) {
    for (int run = 0; run < count; run++)
        grow(amount, seedLimit, chance, growthRadius);
}

We can then use this method to grow our cave system. This is the trickiest part; seemingly small changes to the parameters can create huge changes in the output. Play around with different growth amounts, chances, radii, etc. You can create big, wide smooth caves; or cramped jagged caves pretty easily. I found the following to create a pretty decent “cave” looking result.

oc.growMultiple(8, 1f, 1f, 0.05f, 1);
oc.growMultiple(1, 0.3333f, 1f, 0.5f, 1);
oc.growMultiple(3, 0.05f, 0.5f, 1f, 1);

growing the cave organically

Awesome, this looks good. However, tiles don’t really work with “gradient” or “blurred” edges, so we need to pass it through a simple contrast filter to make the edges sharp and tile-worthy.

public void contrast(float threshold) {
    for(int y = 0;y < _height;y++) {
        for(int x = 0;x < _width;x++) { // for each pixel
            // if it's above the threshold, set it to 1, otherwise, 0
            _map[y][x] = _map[y][x] >= threshold ? 1 : 0;
        }
    }
}

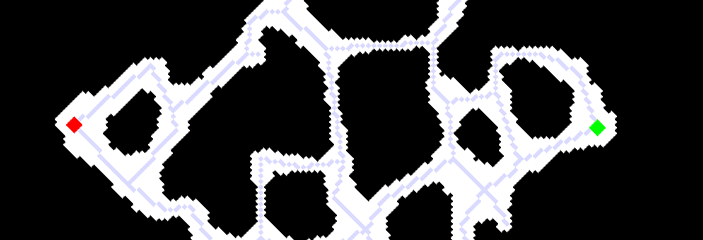
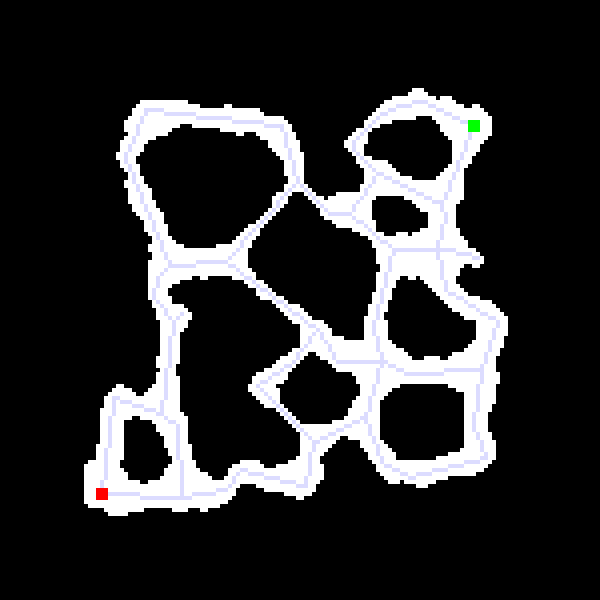
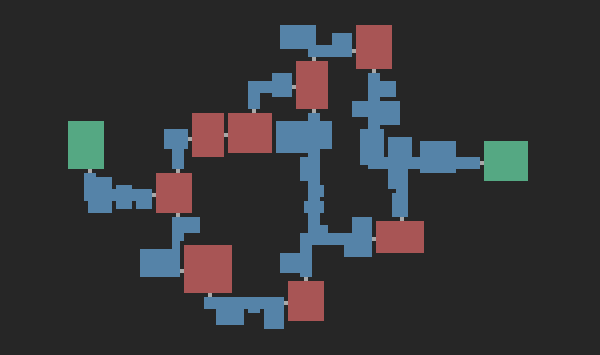
And that’s it. It’s ready to be converted into a tile map. Here’s a sample result, I’ve drawn over the start and end areas (green and red boxes) as well as the underlying graph so you could easily see the extent of the growth:

end result

You can find the full source code here.

Dungeon Generation

I delve in the world of ‘Procedurally Generated’ map generation.

Dungeon Generation Banner Image

In all of my (unfinished) games, a lot of time is taken up with content generation. This includes art, story, skills/combat ideas, map creation and countless other tasks. One of the things that I’ve always been intrigued by is procedurally generated maps and textures. They offer decent, controlled layouts that can be generated on the fly. So recently, I set out to take a stab at it. I think it’s a good start to a real rogue like dungeon generator; here’s how it went.

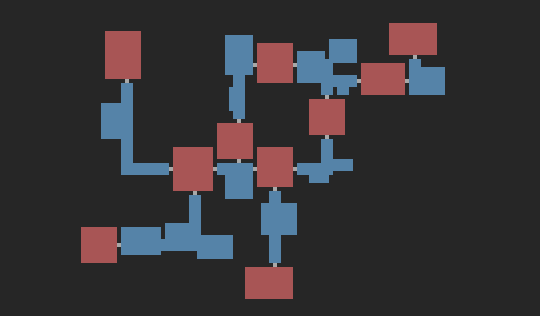
Before we get started, here’s a sample of the end-result. I am really happy with it and plan to eventually generate a tiled map given a tile set.

Sample end result

I stumbled upon this post on Reddit pretty quickly after searching for “procedural dungeon generation” on Google, Procedural Dungeon Generation Algorithm Explained by phidinh6. The post outlines a pretty straight-forward approach to generate random rooms that do not intersect, and then connects them with hallways based on a connected graph. He easily lays it out and gives a nice demo that really helped me visualize the whole process, here.

There were a couple steps that were easier said than done. The first being step 3; specifically “simple separation steering behavior to separate out all of the rectangles.” I couldn’t find anything on the internet that was directly related, but I was able to create something based on what I could see in his demo. The basic idea is to loop through each pair of rooms and shift both the least amount possible to get rid of any overlap. Keep doing so until no rooms overlap. Here’s some commented code to do this step:

// a Room is a simple rectangle (x, y, width, height)
private static void separateRooms() {
  Room a, b; // to hold any two rooms that are overlapping
  int dx, dxa, dxb, dy, dya, dyb; // holds delta values of the overlap
  boolean touching; // a boolean flag to keep track of touching rooms
  do {
    touching = false;
    for (int i = 0; i < rooms.size(); i++) {
      a = rooms.get(i);
      for (int j = i+1; j < rooms.size(); j++) { // for each pair of rooms (notice i+1)
        b = rooms.get(j);
        if (a.touches(b, padding)) { // if the two rooms touch (allowed to overlap by 1\)
          touching = true; // update the touching flag so the loop iterates again
          // find the two smallest deltas required to stop the overlap
          dx = Math.min(a.getRight()-b.getLeft()+padding, a.getLeft()-b.getRight()-padding);
          dy = Math.min(a.getBottom()-b.getTop()+padding, a.getTop()-b.getBottom()-padding);
          // only keep the smaller delta
          if (Math.abs(dx) < Math.abs(dy)) dy = 0;
          else dx = 0;
          // create a delta for each rectangle as half the whole delta.
          dxa = -dx/2;
          dxb = dx+dxa;
          // same for y
          dya = -dy/2;
          dyb = dy+dya;
          // shift both rectangles
          a.shift(dxa, dya);
          b.shift(dxb, dyb);
        }
      }
    }
  } while (touching); // loop until no rectangles are touching
}

He opts to use a Delaunay Triangulation trimmed with a Minimal Spanning Tree to connect the bigger rooms. However, I found naughty’s suggestion to use a Relative Neighborhood Graph to be simpler and to produce better results. It created the loops to make the dungeons more complex while still minimally connecting all rooms. From Wikipedia:

“(A RNG is an) undirected graph defined … by connecting two points A and B by an edge whenever there does not exist a third point C that is closer to both A and B than they are to each other.”

Here’s my implementation:

private static void connectRooms() {
  Room a, b, c; // Rooms to check between
  double abDist, acDist, bcDist; // squared distance between each of the 3 rooms
  boolean skip;
  for(int i = 0;i < corridors.size();i++) {
    a = corridors.get(i);
    for(int j = i+1;j < corridors.size();j++) { // for each pair of rooms
      skip = false;
      b = corridors.get(j);
      // get the sqrd distance between a and b
      abDist = Math.pow(a.getCenterX()-b.getCenterX(), 2) + Math.pow(a.getCenterY()-b.getCenterY(), 2);
      for(int k = 0;k < corridors.size();k++) { // loop through all other rooms
        if(k == i || k == j) // that are not a or b
          continue;
        c = corridors.get(k);
        // get the other two applicable distances
        acDist = Math.pow(a.getCenterX()-c.getCenterX(), 2) + Math.pow(a.getCenterY()-c.getCenterY(), 2);
        bcDist = Math.pow(b.getCenterX()-c.getCenterX(), 2) + Math.pow(b.getCenterY()-c.getCenterY(), 2);
        // if the distance between a and c or b and c are smaller than a, the pairing of
        // a and b is not a graph edge
        if(acDist < abDist && bcDist < abDist)
          skip = true;
        if(skip) // so we break the loop and go to the next a and b pairing
          break;
      }
      if(!skip) { // if this a and b pairing was never skipped, it should be an edge
        if(graph.get(a) == null)
          graph.put(a, new LinkedList());
        graph.get(a).add(b);
      }
    }
  }
}

After these rooms are connected, I needed to generate the hallways required to traverse between them. I wanted the hallways to randomly bend from A to B either clockwise or counterclockwise which caused me some trouble. So much so I needed to look for help at Stack Exchange, here. Thanks to Heckle’s suggestion I was able to find a way to connect the two rooms with connected hallways. There’s a code example on the Stack Exchange page.

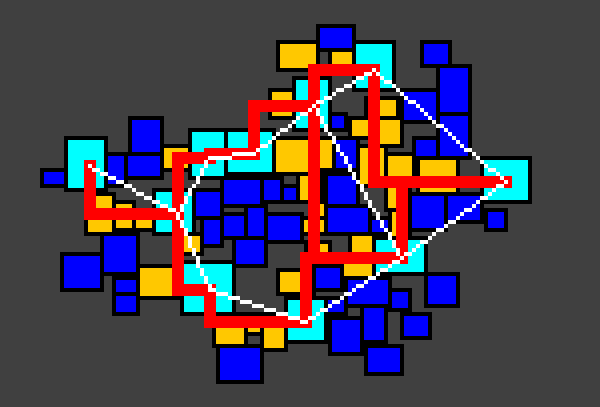
Once I was able to connect the big rooms with hallways, it’s simply a matter of drawing the rooms, smaller corridors and hallways to an image. Pixels can translate directly to tiles, so I plan to generate tile maps based on these generated images. This Image shows a (messy) more detailed result of my methods.

detailed overlay

And here’s a final result. I still need to work on the doorways from the hallways and the big rooms, but it’s a great starting point for a rogue-like map.

simple end result

You can find the full source code on my Procedural Generation GitHub.

Tools & Utilities
Open Comment

Listr was a simple app for keeping itemized lists and sharing them with other people.

The idea came from a mundane problem: Lisa and I wanted one grocery list that both of our phones could edit. Everything we tried was either too heavy or too fiddly for something that should just be a list. So I built my own. (We eventually gave up and moved to WunderList, which we loved - but by then I had already learned the thing I actually wanted to learn.)

You could register, spin up a list, and start adding items right away: check them off, archive the ones you didn’t want cluttering the view, or delete them outright. It auto-completed new items from what you’d added before, which made repeat grocery runs quick. You could add friends and share a list with them to edit together.

The reason Listr mattered to me wasn’t the feature set - it was the architecture. It was my first real attempt at a JavaScript front-end application talking to a web-service API rather than a page rendered whole by the server. The backend was a RESTful API in PHP over MySQL; the front end was served as a shell by PHP and then ran on jQuery in the browser, calling the API for everything. That split - a dumb server handing data to a smart client - is the shape of basically everything I’ve built since.

Source on GitHub

2D Lighting and Shadows

Shadows make the world go ‘round. Thankfully 2d shadow casting is pretty easy.

2D Lighting and Shadows Banner Image

I spent a good amount of time on my “lighting engine” and I’m very happy with the result (so far). There’s still quite a bit that I want to do with the lighting but that will have to be for another day. As of right now, I’ve tackled the most important thing (in my book): shadows. Without shadows, LRK’s lighting system is VERY similar to TWC’s (with a few improvements). It took a lot of work to get to where I am now and I thought what I learned was worth sharing. For the first time on my blog I’m going to go over how I did what I did. Once that’s done, I’ll briefly go over what I could do better and what I have planned for my lighting engine’s future.

The Light Map

The general method to my lighting engine is as follows:

  • Create a new Frame Buffer (light map) to draw the light map on.
  • Fill the light map with the ambient light color
  • Draw the lights to the light map with an additive blend mode.
  • Draw the light map over the game’s graphics component with a multiplicative blend mode.

To add shadows, I do this for each light before I draw it to the light map:

  • Draw the light image to another Frame Buffer (light buffer).
  • Tint the light buffer with the light’s color by filling the light buffer with a color while using a multiplicative blend function.
  • Draw the shadows over the light buffer in black.

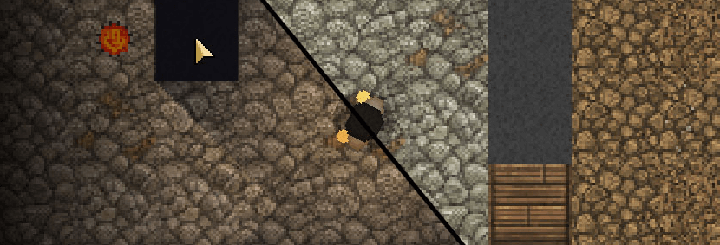
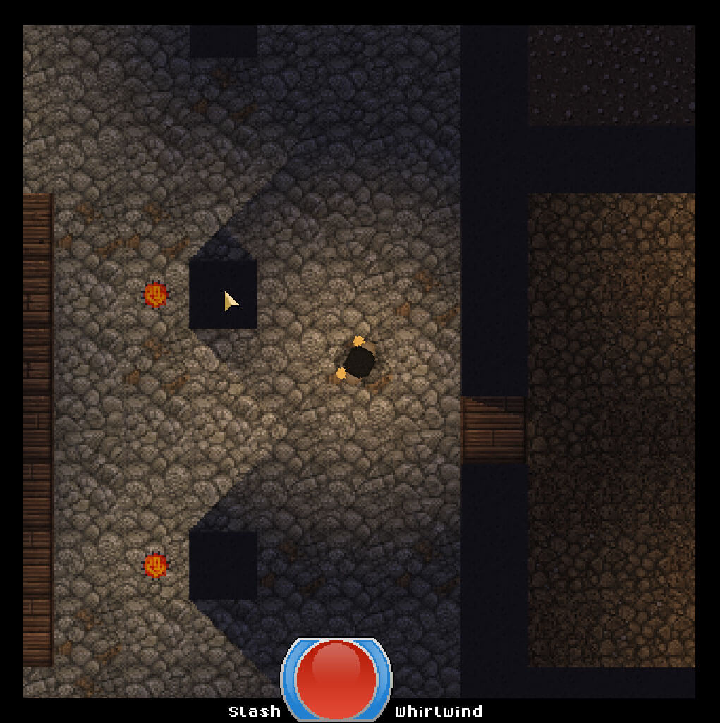
Here are some visuals to help you follow along. For comparison here is what the game looked like before I added any kind of lighting.

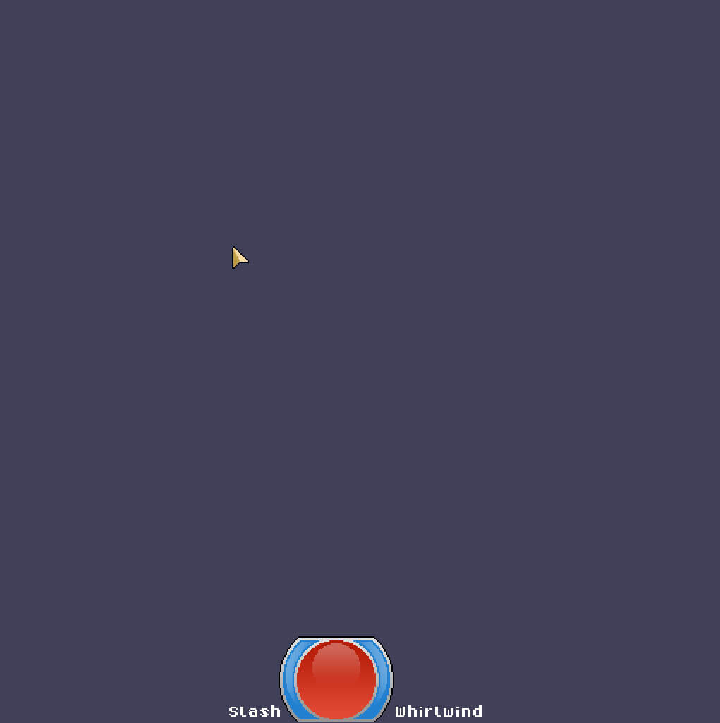
starting point

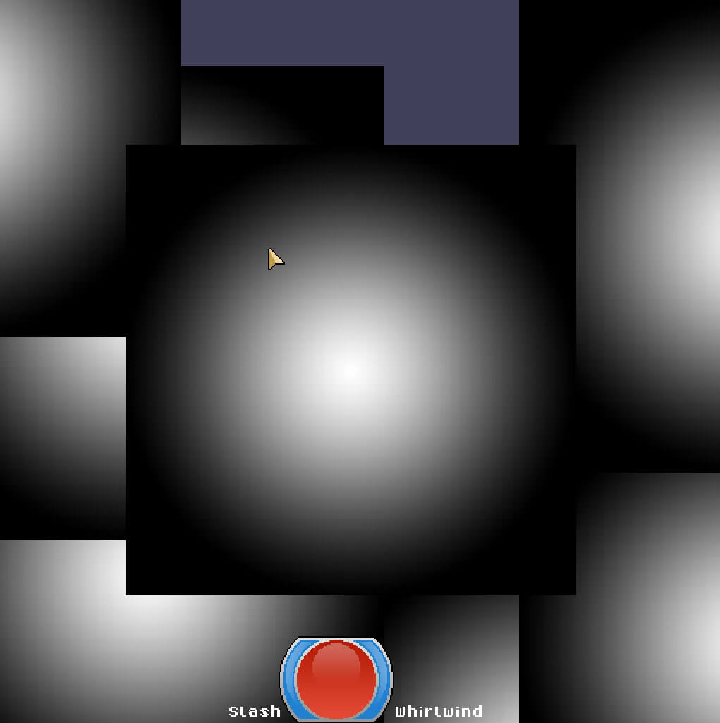
The first step is to create the light map and fill it with ambient light. For this demonstration, I am not using a blend function to draw the light map so it’s easier to see what’s going on.

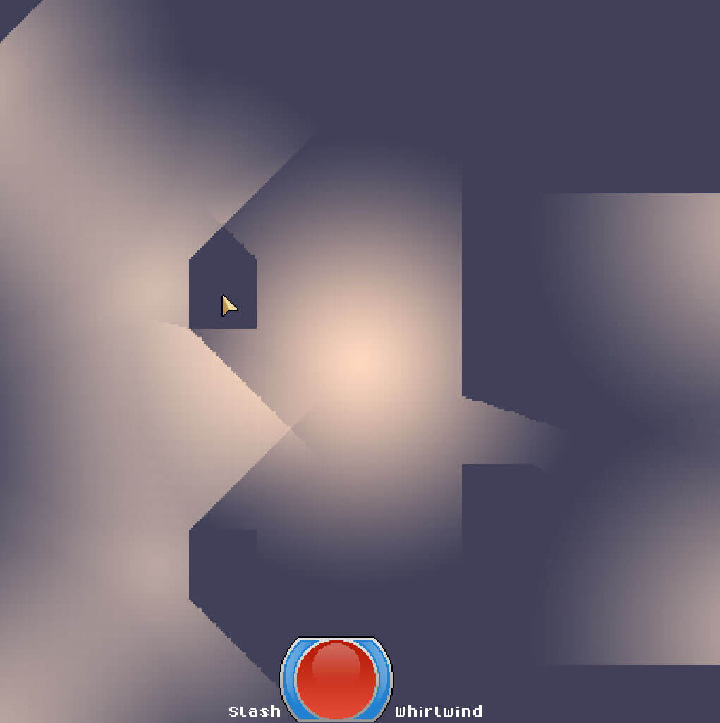
light map - ambient light

Then, I draw each light over the light map.

add each light

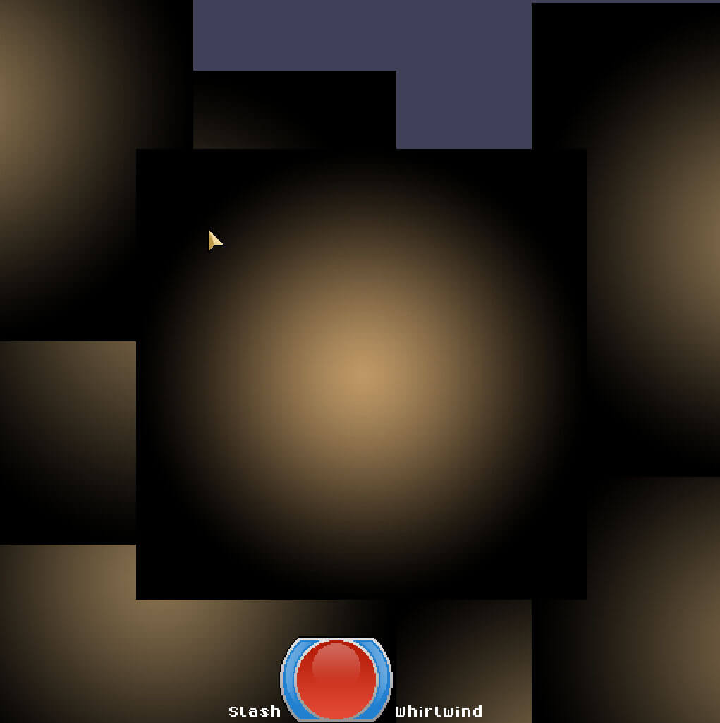
For each light, I fill the light buffer with the light’s color using a multiplicative blend function. (Note, this is not the actual order of drawing, I would tint the image as I draw it. I separated the steps here to make it easier to follow.)

overlay on map

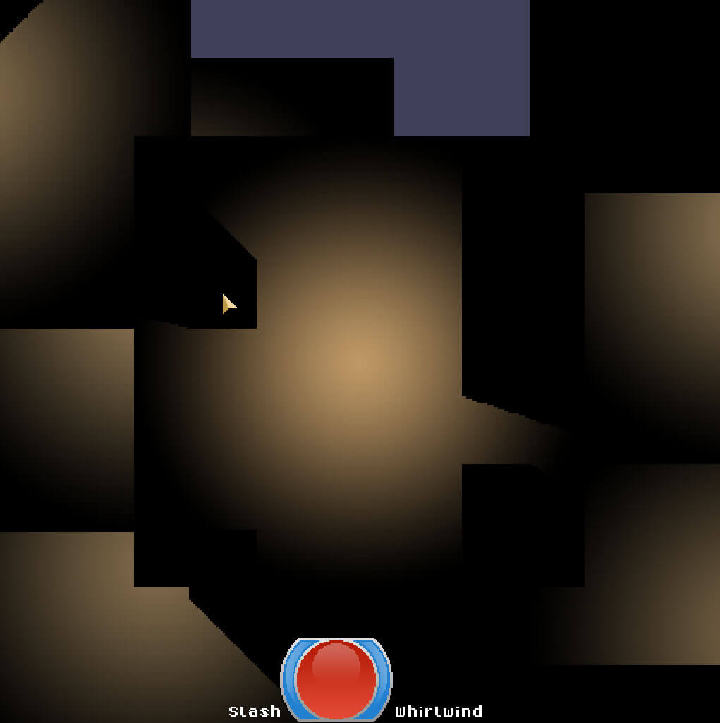
Then for each light I remove the shadows (I’ll go over this later) by simply drawing a black polygon where the shadow should be. (Again, this should be done to the light buffer BEFORE drawing the light to the light map.)

cut the shadows

To add the lights to the light map in a “lighty” way, I draw each light buffer to the light map with an additive blend function. You can see the sources of light and their shadows very well here.

multiply blend mode

Now, when I draw the light map to the game’s scene I use a multiplicative blend function and TA-DAH, light has been born.

light map drawn

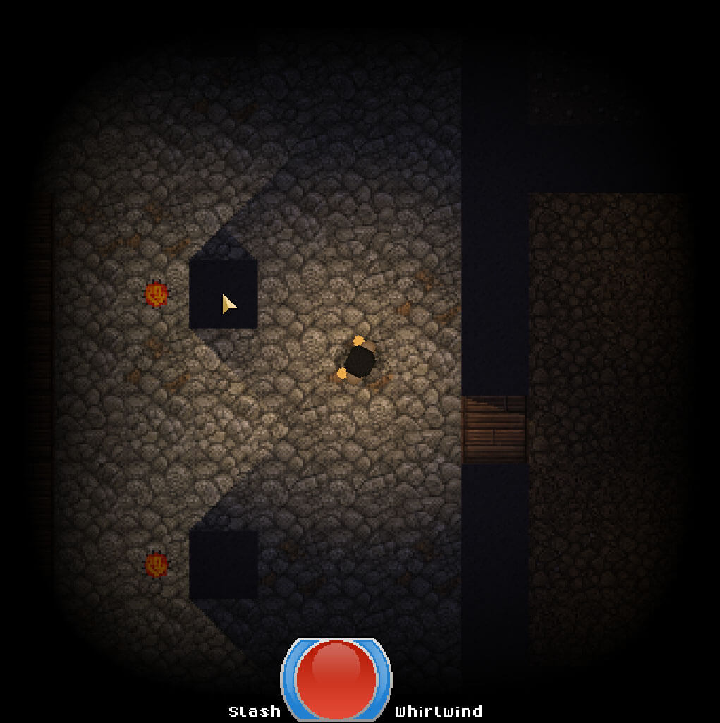
To make the render distance (which is determined by the light the character is holding) less harsh, I draw a simple vignette around the images (which is just a scaled, transparent, black image).

darken edges

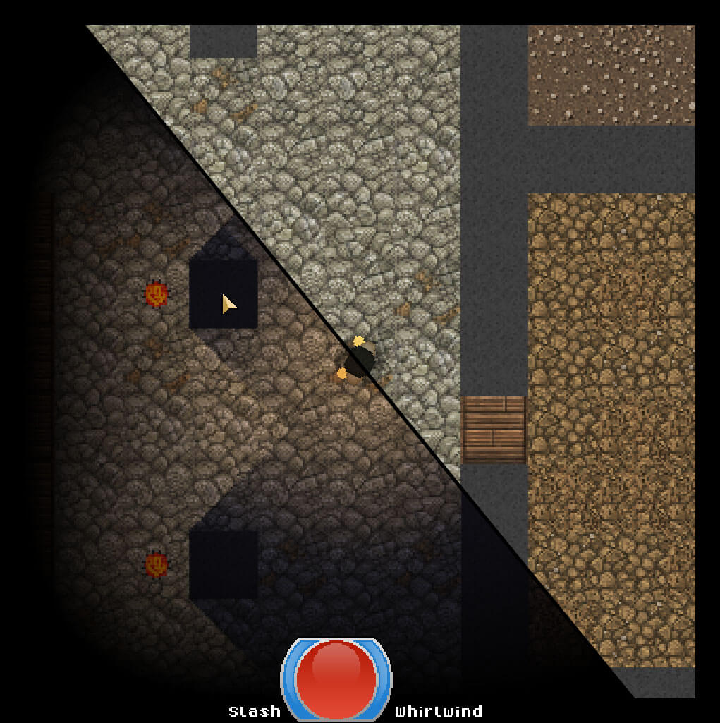
And for a final comparison. The difference is night and day - lighting adds so much more to the game than I thought it would.

comparison

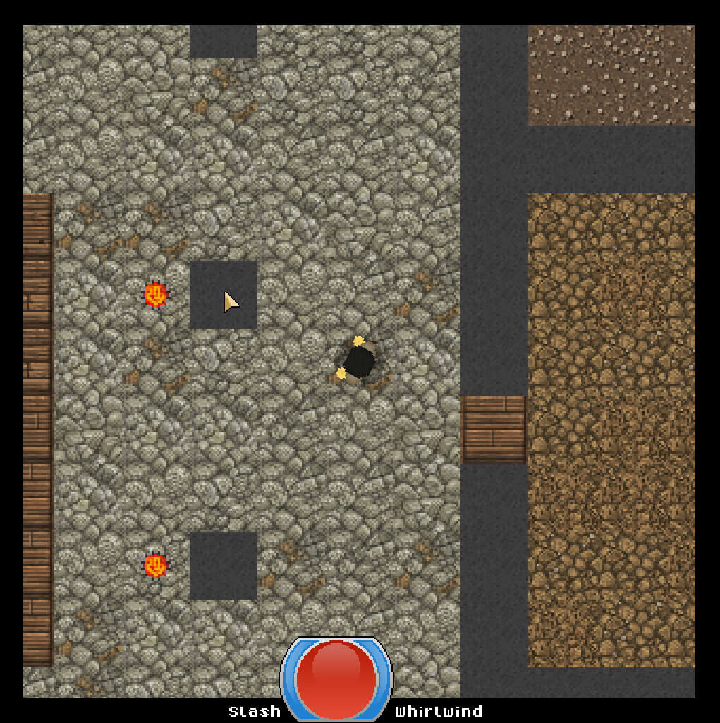
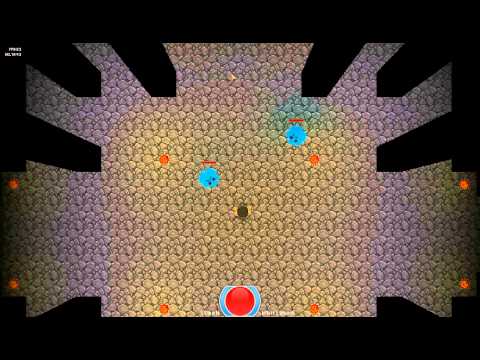
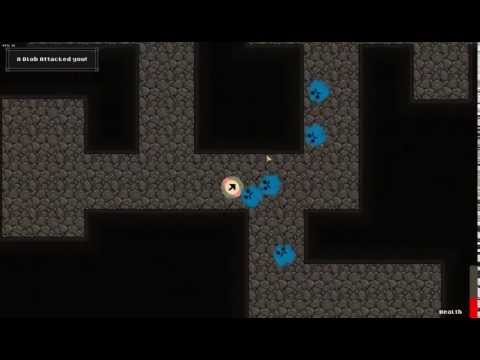
Here’s a live-action demo of the lighting in action. This video also features a giant horde of slimes and an OP player.

Shadows

I would not have been able to work out these shadows without the help of this video: Here. I would strongly suggest you watch that video if you really want to understand how this works as he gives a lot of good visuals. I will admit, I have become a bit of a graphics softie thanks to using Slick2D, so I adopted his method and came up with another, less efficient way to go about it.

When I load the map, I create the 2D world with JBox2D based on a collision layer in the Tiled map. When I create a static wall with JBox2D, I also keep an array of lines (2 points) for each wall’s edge. I use these lines as “light blockers”. After I draw the light image to the light buffer, I pass the light buffer, the lights position and other world data to a method. This method then goes through each of these shadow lines that intersect the light’s affected area.

example light point, and shadow line

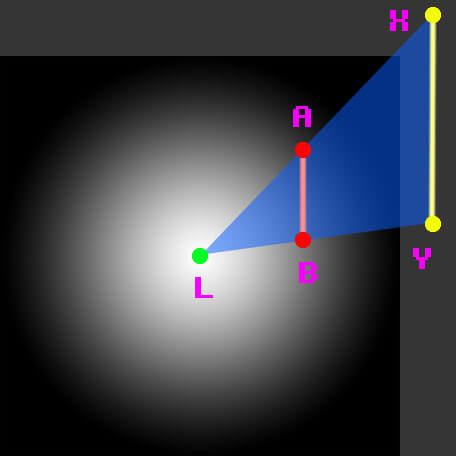
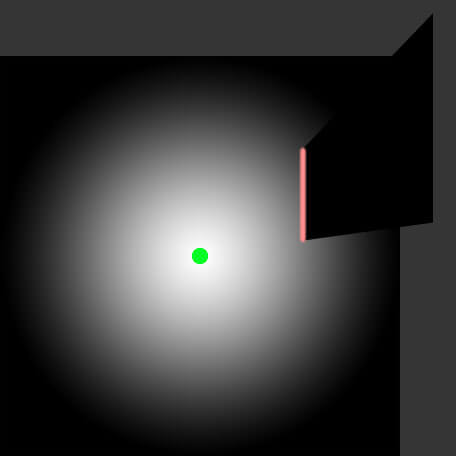
This diagram shows the light image, 5 points, the shadow line and the triangle of light we’re working with. For each shadow line (here the line is A,B), you can make a triangle of light that should be shown (here it’s the triangle L,A,B). If we think of this triangle as a point and 2 vectors (point L with vectors L>A and L>B) we can scale the vectors equally to create a similar (larger) triangle (L,X,Y). Then, if we subtract the original triangle from this bigger one we end up with a polygon (A,X,Y,B) that encloses the space the shadow this line produces from this light. Once we have that polygon, we can simply draw it over the light buffer as so:

shadow polygon left after cutting

I left the point of the light and the shadow line in this image for demonstration. Also note the dark grey is outside of the light buffer and is not actually drawn to the screen. This happens for every shadow line we have.

What I Could Do Better

There is one major thing I could do more efficiently, but for right now the system is alright as performance is not hurt too harshly from my not-so-efficient ways. As described in the above video, the best way to implement the 2D shadows is to draw a triangle fan that is constructed by clipping a quad where there is an intersecting shadow line with the light’s image as the texture. This would give many fewer draw calls and less resources. If I implemented it this way, each light could be drawn directly to the light map without the need of a separate buffer to draw the shadows.

Another minor issue is the number of calculations per frame I have to make for each light. Most lights are static in their position. I don’t plan to have moving entities that create light shadows, so I could pre-calculate each triangle fan or shadow map when the light is generated. If I use this method, I would have to update any lights’ shadow maps when the surrounding environment changes (door opens, gate closes, etc).

The Future

The biggest thing I’d like to add in the future is a shader to blur the shadow edges. This would do a couple things:

  • It would ease the shadows by keeping the shadow/light contrast from being so sharp.
  • It would add the illusion of the umbra family. (more realistic lighting)
  • And finally it would allow the player to better see the edges of the surrounding walls’ textures which would add more character to each map.

Another small thing I’d like to do is to adjust the blending function of the lights being drawn to the light map. Right now, things can become very “washed” when there are lights close together. In TWC I combated this with alpha blending, but lights that are drawn later still overpower lights drawn before it. I’m not sure if there is a better way to go about this blending, but I want there to be.

PS: I would like to give a shout out to John Smith for this John Smith’s texture pack. I used textures from his Minecraft texture pack for this demo.

11 more notes

in Lost Relics of Kazar ··

College School Work
Open Comment

Demos from my final project for my college physics simulations class - a billiards/pool simulator.

Early stages

Pool Simulation - Early Stages

Final stages

Pool Simulation - Final Stages